
Safety is very important. You should always be careful when soldering. Use safety glasses, and be careful.
To make a bulb discharger, you will need the following:
10 #1157 automotive bulbs
approx. 2-3 feet of copper wire, not the braided kind
soldering iron
good 60/40 solder
connector to fit your batteries
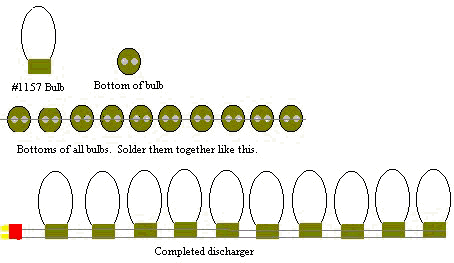
Making this discharger is very simple. First, cut the wire into 2 equal pieces. Next, take a piece of wire, and solder the bottom 2 "nubs" of a bulb near the end. Do the same with the rest. Look at the sketch below if you need help. When all 10 bulbs are soldered together on the bottom, then its time to solder the cans together. Take the second piece of wire, and solder it to each can. Once you've completed that, just cut the ends as long as you want them to be, and solder on your connector. There is no + and - for this, either way will work. Now you should wrap some electrical tape around the wires, just as a precaution. Thats it!!! Your discharger should look something like that below. You can arrange the bulbs differently, but this is the simplist way. Now if you want to complete your discharge system, check out the how to build a cutoff device article.
